Use case 2: Anonymous behavior-based segmentation
Value statement
Anonymous Behavior-based Segmentation, powered by Lytics, unlocks the ability to personalize user experiences before a customer ever identifies themselves. By collecting and analyzing real-time, non-personally identifiable signals such as page views, content interactions, and taxonomy tags, Lytics dynamically segments users based purely on their demonstrated intent and interests. This capability ensures that even first-time or returning anonymous visitors immediately receive highly relevant, contextually appropriate experiences, bridging the gap between initial engagement and eventual identity resolution to maximize conversion potential.
User journey
- User explores content tagged with a given Taxonomy
- Taxonomy is pulled from Contentstack Entry and sent to Lytics associating a user's profile with an interest in particular.
- Anonymous segmentation
- While the user still hasn't provided us with an identifier, the user is added to the segment we configured on Lytics for users that show an interest in content associated with the taxonomy you defined.
- Personalized attribute sync
- Attributes and user segments get synced to Contentstack Personalize preparing our user to get delivered a personalized experience based on the interest they have shown in cuisine.
- Curated home page example
- See something on the home page that is curated for interest (e.g., a dominant hero banner featuring images relevant to "Taxonomy X Enjoyer").
Validate: Confirm taxonomy values are sent and mapped, segments evaluate correctly, and content is targeted as expected.
How to activate
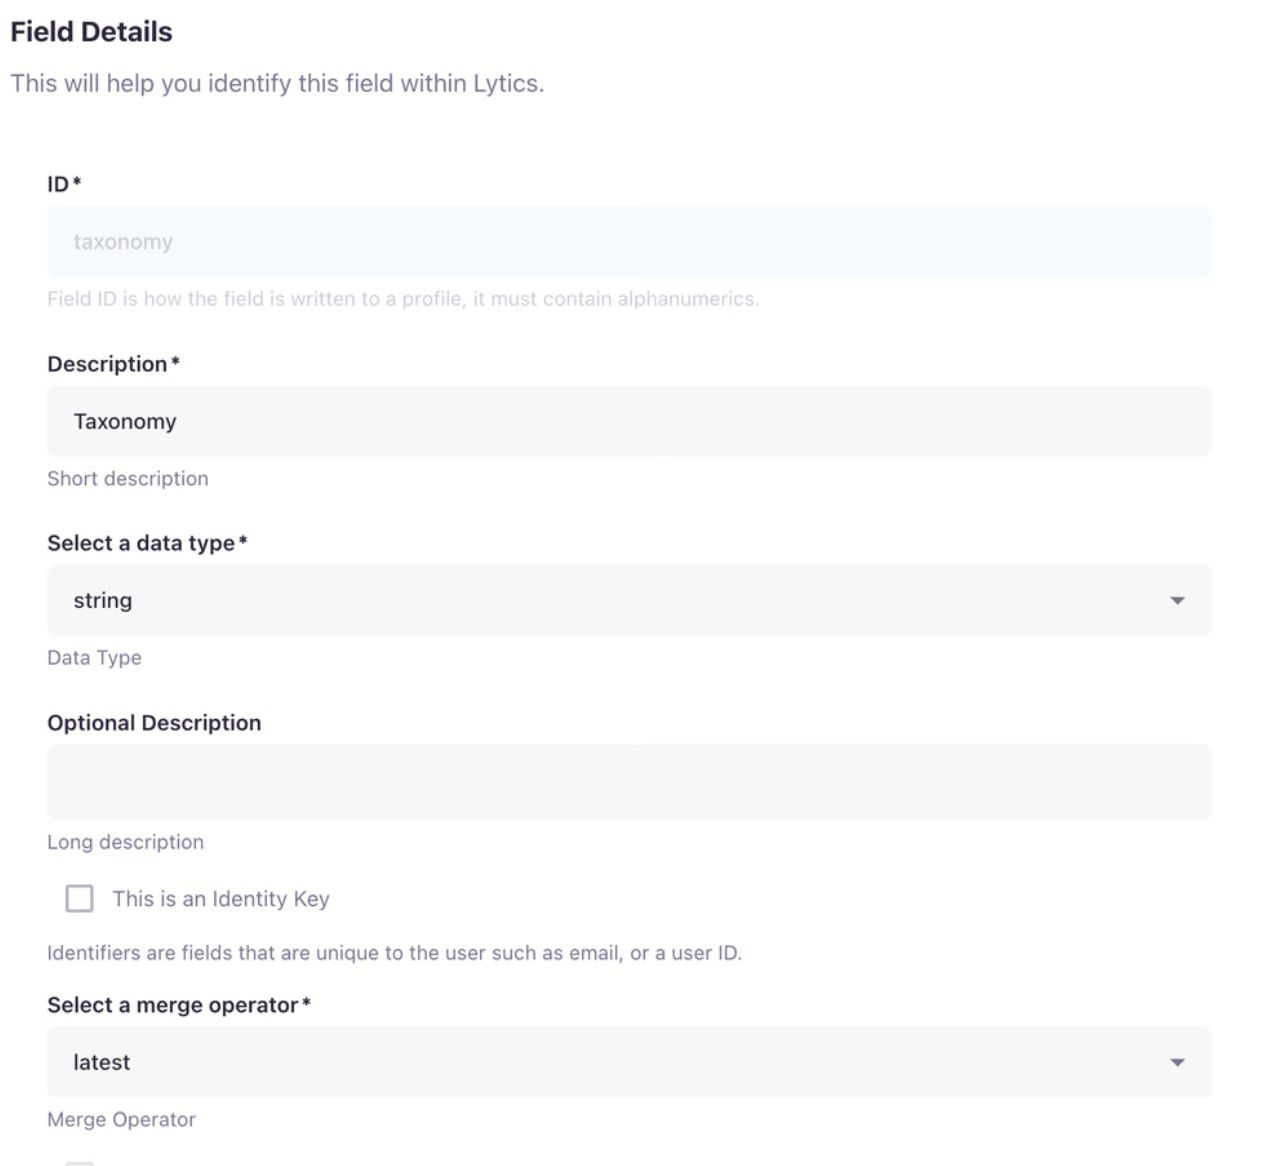
- Create Taxonomy field: In this use case we're utilizing taxonomy as a benchmark for user behavior/interests. To do that we need to set up Lytics to listen for the signals. We can start by creating a field named Taxonomy in our Lytics Schema. In Lytics, navigate to Building Profiles -> Schema -> Fields on the left hand side of the screen inside our Lytics account and create a new field. In our case we want to look at the most recent taxonomy viewed so we'll set our merge operator on this field to "latest" so that the most recent taxonomy value received by Lytics will be associated with our user's profile. Press 'Create field' at the top. Data Type should be string.
2. Create a aapping for our Taxonomy field: Now that we have a field created for Taxonomy we need to create a mapping for this field in order to receive the
signals from our Lytics Jstag SDK. Navigate to Building Profiles -> Schema -> Mappings and create a new one. Search for our newly created Taxonomy Field and select it. For our expression on this mapping we're going to type taxonomy and select the default stream. Type in taxonomy in the expression field, too. No condition is needed. This means that we can send over information about a user's viewed Taxonomy field by using the key taxonomy in our code base
(ex: jstag.send({taxonomy: taxonomyFromContentstack});). Press Create Mapping at the top.
3. Publish schema: Navigate to Building Profiles -> Dashboard, scroll down to find Schema Summary and Publish the Changes you've made to the schema.
Follow the prompts/steps to publish your changes. You will need to provide 'Schema Version Details'
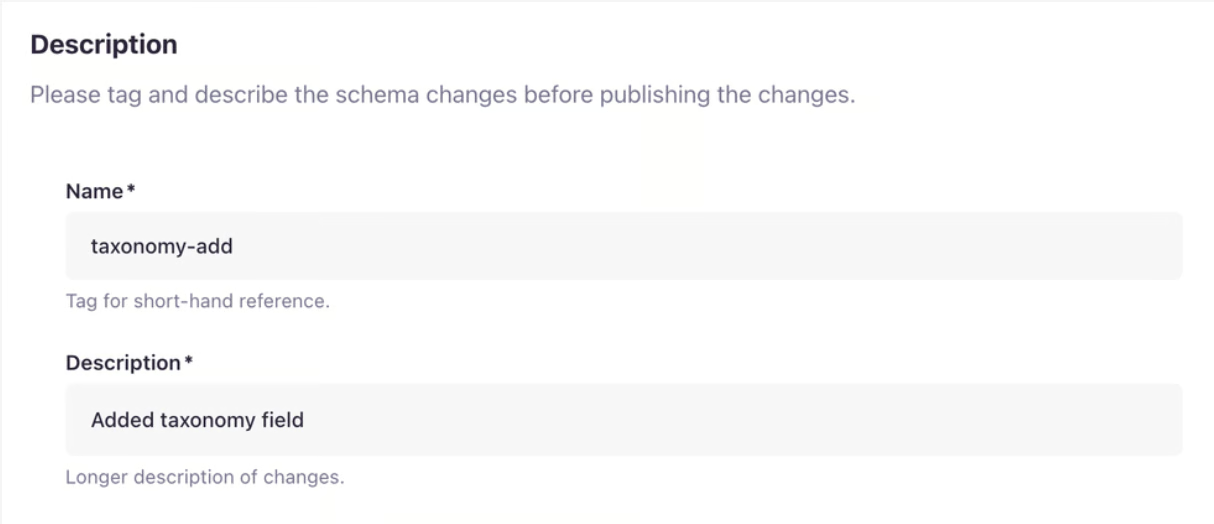
Press Publish to finish the update. It's recommended to reload the screen at this point, that way the UI will reflect the latest changes. View Fields/mapping documentation.
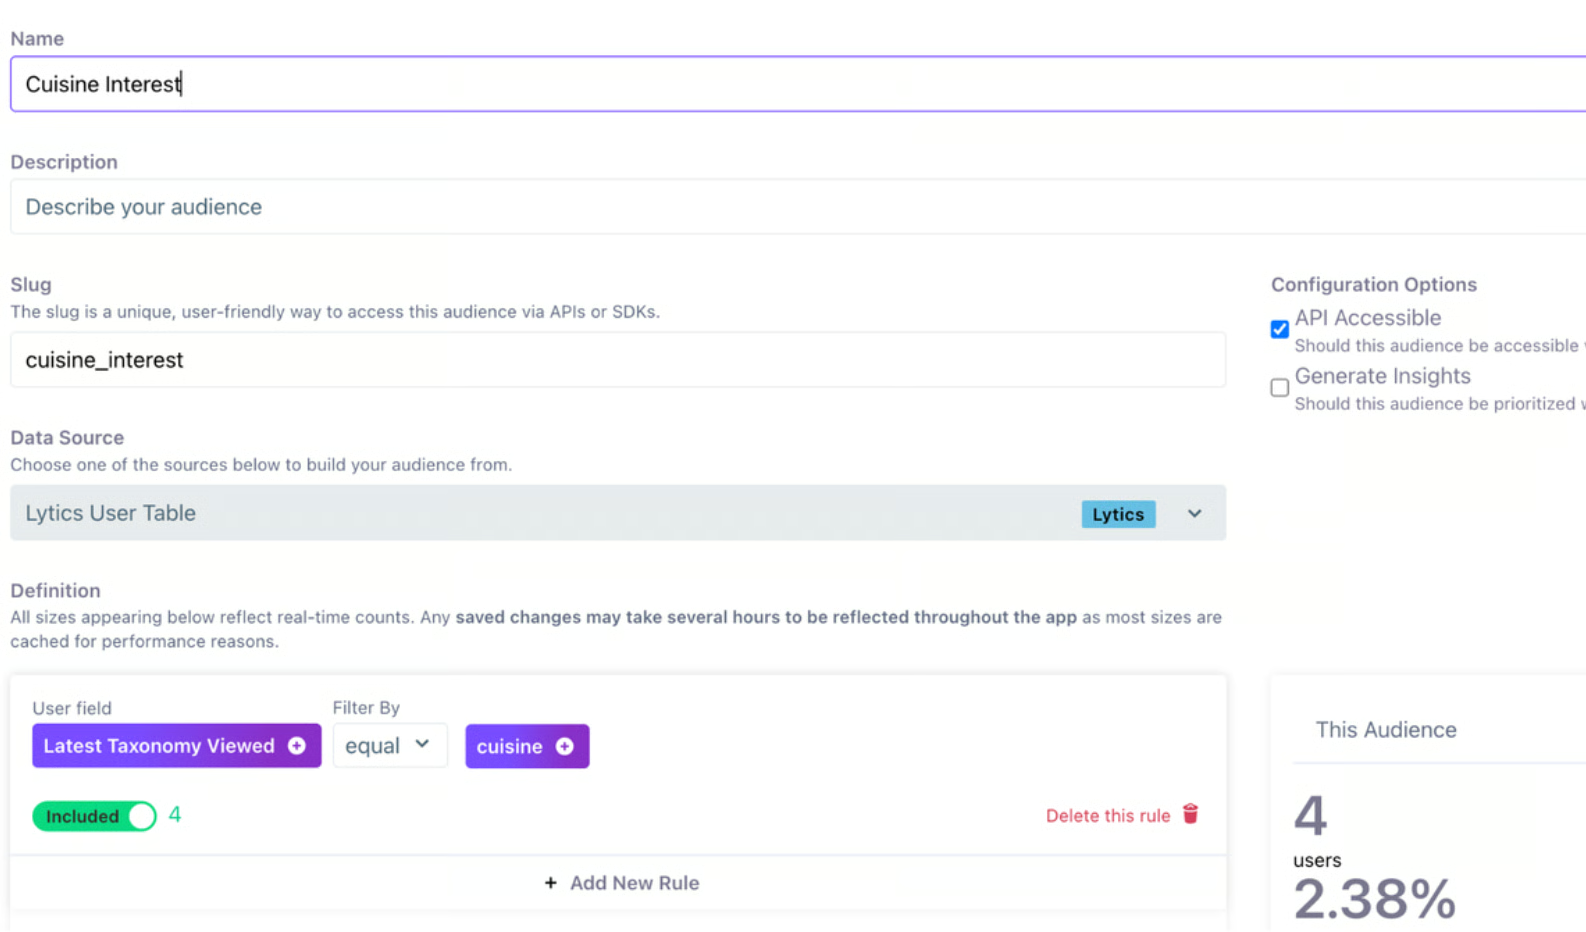
4. Build a segment: Navigate to Using Profiles -> Audiences and create new. Name your audience as you see fit, and scroll down to custom rule. When in the custom rule section search for your taxonomy field you created and select it. Then choose your operator — in our case the audience rule will be taxonomy equals cuisine — then click the add condition button. Check the API accessible box to ensure it gets synced to your Personalize project and save your new segment. Now press 'Create' at the bottom. View Audience/Segments documentation.
Configure your Front End to Send Taxonomy from Contentstack on Page Load: In order for us to track when a user has viewed a page with our taxonomy on it we'll need to send that Taxonomy value over on page load. Below is an example of a useEffect hook that loops through all taxonomies and identifies the "article" type of taxonomy, pulls that value off of it and sends it to Lytics. This setup is valid in React or Next.js applications.
useEffect(() => {
if (entry? taxonomies && entry?.taxonomies? length > 0){
const articleTaxonomy = entry?.taxonomies?.find(
(tax) = tax? taxonomy_vid === "article"
)?. term_uid || null;
if (articleTaxonomy) {
jstag.send({taxonomy: articleTaxonomy})
console.log("jstag.send ({taxonomy:", articleTaxonomy, "}); ")
}
}, [entry])
5. Create the Experience in Personalize: In Contentstack Personalize, click the New Experience button.
6. Select Experience Type: Choose a Segmented Experience.
7. Provide a Name and Description and move on to the Configuration section.
8. Add a variant to the experience.
9. Target the segment: In the Experience Configuration, navigate to the Target Group section, select Selective, and choose the Lytics segment you created (e.g., Taxonomy X Interest Segment').
10. Link variants and content types: Now that your draft is saved we can navigate back to the CMS and into our Stack. Once inside your stack navigate to Settings, scroll down on the left hand side of your screen till you see Variants as an option and click the variants button. You will see a menu of all of your created experiences. From here you can select your newly created experience. Linking Content Types to variants.
11. Create personalized content: In the CMS, create variants or personalized entries for the linked Content Type(s) that are tailored to the anonymous user's demonstrated interest (e.g., a Homepage banner featuring "New Italian Recipes" for the 'Cuisine Interest Segment').
12. Go back to the experience and activate it: Save and Activate Draft in Contentstack Personalize. Anonymous users exhibiting the defined behavior will now see the personalized content based on their real-time actions.
Validate (recommended): Confirm (1) taxonomy values are sent on page load, (2) the taxonomy field populates on Lytics profiles, (3) the audience rule evaluates true for test users, and (4) the segment is selectable in Personalize targeting.